The Tiffany Reproduction Rosebush is now complete, all 880 pieces of it. I apologize in advance as this is probably the longest post in history, but there's a lot of steps in making a lamp.
So, from start to finish, here's the process.
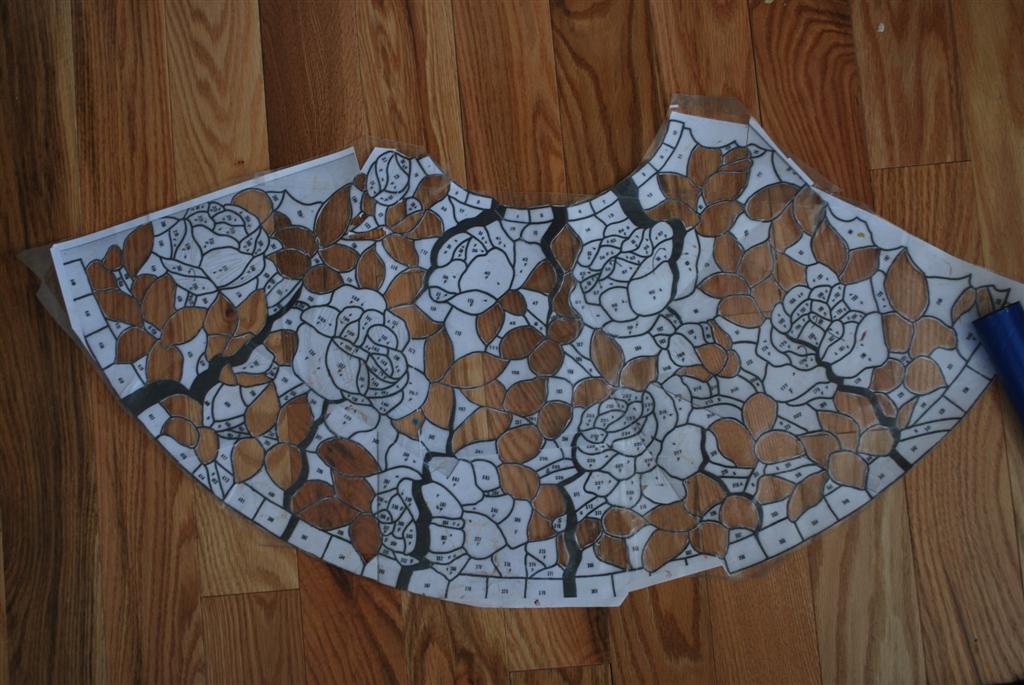
First, we begin with a pattern. Joel had two additional Mylar (a heavy plastic) copies made for me at a blueprint shop.
We use one of the copies as a holding pattern and cut the other pattern apart for use as guides for cutting the glass. As I cut each pattern piece out, I apply a dab of poster putty to the back and stick the piece back onto the holding pattern for safekeeping.
I always take one copy of the pattern and color it with colored pencils so I have an idea of the look I would like to copy in glass. The coloring allows me to see at a glance on the pattern which area is flowers or leaves or background. It is rather hard to duplicate all of the shading perfectly using glass, since not all glass is streaked or shaded in just the right places, but the pattern helps me by giving me a model to follow.

The next step is to make three paper copies of the pattern so I can make 'windows' for glass selection:


On each of the paper patterns, the center of the shapes is removed, leaving only the black lines which represent the lead lines intact. In this way, I can place each window on my light table with the art glass illuminated and find the correct areas in the glass for what I'm trying to interpret.
First, I have to select the glass sheets I want to use. Every lamp is heavy on glass usage; I went through about five 24" x 36" sheets of beautiful red, white and pink reproduction glass to find the shading I wanted for the roses. I think this red glass by Youghiogheny Glass looks like strawberries and cream.
 Above is a window for one of the roses. I take the window and place it on the glass, looking for The Best Petal placement. Seen below is one possibility for the larger petal in lower middle part of the picture:

And here's another:
 And yet another one:
 The possibilities are endless, and often make me a little crazy, but eventually I do decide on which part of the glass makes the best petal. It seems to be a horrible waste of glass when you see how much distance is between the pieces as I hunt around on the sheet looking for the colors I want and it took me a long time not to worry so much about the cost. Art glass is not cheap, but I am, unfortunately! There is a lot of drop or waste glass when we are done cutting, but the results of differences in shading in the flowers is worth it. We don't discard the scrap glass; eventually another project may come along which might be perfect for it.
After I select the area on the glass I want to use, the Mylar pattern piece is stuck on the sheet glass with a glue stick. I have to let the glue stick dry before cutting the glass, so I usually lay out quite a bit of the pattern at a time and let the glue dry before cutting. I've had the best results by laying out glass the night before and then cutting in the morning or next afternoon.
Then I go through the same process with the leaves and background:

 Here many of the leaves are glued on the glass. To the left of the glass, you can see the garden catalogs...I use the pictures in them to help me decide on shading. Some of the catalogs have such splendid photos.
 In the above picture, I was trying to decide on glass colors for the background, so I took the background window pattern and laid it over two competing sheets of glass on the light table to see what I liked better. I loved the shades of reddish pink and blue in the one on the left, but the sky blue and greenish turquoise on the right was the one I went with. I wanted to shade the lamp's background from dark blue at the top to lighter blue-green on the bottom. (That was the plan, anyway, in reality the result was very subtle.)

Whenever Joel has some spare time, he will cut glass. First, he will make separating cuts between the pieces (if I left him any room---sometimes I'm guilty of not thinking ahead) and breaks the 24" x 36" sheet of glass down into smaller hunks for easier handling. Then he will cut the individual pieces out one at a time, using the various tools seen on the cutting table, very similar to the way glass has been cut since stained glass was invented. The main cutting tool we use is a pistol grip glass cutter:
 The glass cutter has a carbide tip to score a line on the glass:


So, from start to finish, here's the process.
First, we begin with a pattern. Joel had two additional Mylar (a heavy plastic) copies made for me at a blueprint shop.
 |
| Odyssey Pattern |
I always take one copy of the pattern and color it with colored pencils so I have an idea of the look I would like to copy in glass. The coloring allows me to see at a glance on the pattern which area is flowers or leaves or background. It is rather hard to duplicate all of the shading perfectly using glass, since not all glass is streaked or shaded in just the right places, but the pattern helps me by giving me a model to follow.

The next step is to make three paper copies of the pattern so I can make 'windows' for glass selection:
one for leaves

another for flowers and

the third for the background.
On each of the paper patterns, the center of the shapes is removed, leaving only the black lines which represent the lead lines intact. In this way, I can place each window on my light table with the art glass illuminated and find the correct areas in the glass for what I'm trying to interpret.
First, I have to select the glass sheets I want to use. Every lamp is heavy on glass usage; I went through about five 24" x 36" sheets of beautiful red, white and pink reproduction glass to find the shading I wanted for the roses. I think this red glass by Youghiogheny Glass looks like strawberries and cream.
 |
| You can barely see the little pattern pieces glued to the bottom of this sheet of glass. Though the glass looks white near the bottom, in transmitted light, the color is red, pink and white with different depths of color shading throughout. |
 |
| Sheet #2 |
 |
| And Sheet #3 of the five sheets I used. |


And here's another:


After I select the area on the glass I want to use, the Mylar pattern piece is stuck on the sheet glass with a glue stick. I have to let the glue stick dry before cutting the glass, so I usually lay out quite a bit of the pattern at a time and let the glue dry before cutting. I've had the best results by laying out glass the night before and then cutting in the morning or next afternoon.
Then I go through the same process with the leaves and background:
This is a sheet of green, brown and yellow glass from Uroboros Glass on the light table.


Here is the blue Uroboros background laid out for the first repeat, this was a much smaller piece of glass than the full sheets.

 |
| Closeup view of the carbide tip |

Here is a time lapse video Joel made of the cutting process. Just click on the arrow to view. (Too bad we can't cut glass that fast in real time.)
The next step is to take all the pieces of glass over to our glass grinder and grind off all the rough edges. This is where the procedure differs from the traditional method used by the ladies in the glass cutting department way back in the day of Louis Comfort Tiffany. They had no glass grinders to use one hundred years ago, and had to rely on grozing the glass pieces by hand. We do a fair amount of grozing with glass pliers too, but it's always nice to smooth out the rough edges with a diamond bit.

Tiny piece having the rough edges ground off.
After the grinding process, the pieces with the Mylar still attached are dipped one at a time into warm water (my old deep fat fryer set on Warm is the best appliance I have for this chore) and the glue is washed off the glass piece and the Mylar. I put the Mylar and its glass double side by side on an old towel and then dry each one individually.

Using a marking pen, the number of the pattern piece is written on the glass so I have an easy time of finding the place on the lamp form.

The Mylar pattern pieces are replaced on the holding copy so they can be used to cut the next repeat of the pattern. The glass pieces are placed on an old window pane I set in the living room window and then obsess over whether I have the shading perfected or not. Anything that looks like an oops can then be recut in a different color. (Unfortunately, I have a lot of oops at times.)
 |
| A few rose petals being scrutinized. |
This process is then repeated until the shade is complete. Some patterns have only one repeat, some have up to five...meaning you have to cut each of the pieces of glass up to five times to finish the shade.

The process continues, with more glass cut day by day:

Until finally, the two repeats are finished. Here they are, above, propped up in our living room window on their two separate panes of glass. Another thing to keep in mind when building a shade is how the two repeats will look when they are joined together. I asked Carl to buy me a big sheet of Plexiglas and I transferred all the glass pieces over to it so I could see how it all looks together.

Here it is in natural light (very hard to get a good photo with all that snow in the background!)

And here it is balanced precariously with a light bulb behind it, with Carl holding it up and me taking the picture. The problem with lamp-making though, is you never really know what it looks like until it is off the form, after the soldering process is done.
Once the glass is all cut and ground and washed and labeled and the colors are as good as they are going to get, I sit down and wrap copper foil around each one.

This is where I step away from the correct procedure (I'm silly, I know)....most people who make shades will place each piece of cut glass on the lamp form first to see how the pieces fit and make adjustments in grinding until the fit is perfected. They then remove the pieces one at a time and foil them, replacing each piece on the form as it is foiled.
 |
| Yikes, I need a manicure! |
 | |
| Here the foil is wrapped around the glass, the next step is folding down the edges and... |
 |
| finally, the rubbing the foil down tight |
 |
| known as 'Burnishing' |
I like to watch TV while I foil glass as I find it to be relaxing in the evening, so I just go ahead and foil all the pieces of glass first before putting them on the lamp form. Yes, we have to remove the foil on a few of them once in awhile when we get to the fitting stage if they need grinding, but by and large, it works out pretty well. Doing it my way, I don't have to sit and foil in a marathon-type way...I often am foiling glass in between laying out and cutting and grinding it, and whenever I have a few moments I can grab the glass and foil for a bit. In fact, I've been known to tote my glass with me in a Ziploc bag and foil while visiting friends. (I know, that's weird and possibly rude, but Winter is short!)
So, after all the glass is foiled, we then proceed to the fiberglass form made by Odyssey. Odyssey forms were made using original Tiffany shades as patterns and are as close to the real deal as a person can get. The forms are made of an almost indestructible fiberglass and have the pattern lines incised on them. Because I am a glutton for punishment, I enjoy taking a fine line permanent marker and following the incised markings; I fill in the outline of each piece on the form and then also write the number of the pattern piece, too. This way it is very easy to find each glass piece's place on the form.
In the picture below, the form looks dirty with leftover beeswax covering it--this was taken after the lamp was soldered. All we need to do is heat the form up a little with a heat gun and the wax will wipe right off, leaving a nice, pristine form behind.
 |
| Odyssey Rosebush Form |
The next video shows Carl and I taking turns putting the glass pieces on the form. First, Carl brushes melted beeswax on the form and then we proceed to sticking on the glass. I'm not sure why we have the other lamp shade sitting on the dining room table--it has nothing to do with the procedure.
Just hit the arrow to play and if you want, you can expand the size by clicking on the lower right-hand corner.
If you're still with me (and I know, this is very LONG post) the next step is soldering. Carl spent hours just pushing the glass around on the form, trying to get the pieces all in perfect alignment and the top rim even. Carl (and sometimes Joel) does the soldering as a rule. I know how to solder too, but each of us has their own particular gift when it comes to stained glass, so we all do what we're best at. Carl likes to solder out on our front porch, since the smell of burning flux (the paste applied to the copper foil for soldering) and melting lead isn't very pleasant to be around. He wears a mask when he solders, too, to protect him from the fumes, but in the pictures below, he doesn't have it on as I asked him to look less alien-like.
 |
| Poor Carl, out in the frigid February weather on our unheated screen porch. |

Solder in one hand, soldering iron in the other, putting this whole project together.


He would work on soldering after working a full day at his job for about four hours at a stretch. When he came inside, it would be after dark and he would shiver uncontrollably for the rest of the night. The things we do for art.
After approximately 14 hours of soldering, which took over a week, Carl finally had the soldering completed. The moment of truth had come. It was time to remove the shade from the form.
Carl made his own lamp positioning jig for soldering that holds the heavy lamps in any position and also swivels very easily. The only problem with the lamp positioner is the fact it weighs so much and is clumsy; moving it is a delicate operation with the stained glass lamp perched out on the end. Carl and I wrestled the tool off the front porch and back into the house. We hooked up the heat gun and started spinning the lamp. The trick is to get the glass warm enough for the beeswax coated glass to melt off the fiberglass form and come free. For me, this is a nerve-wracking step in lamp construction, we've made seven lamps so far, and haven't dropped any. Yet.
Round and round we go and when it falls off the mold, nobody knows. (But somebody better be there to catch it!!!)
Finally, fifteen minutes later, the wax melted, the shade came free and Carl was holding it in his hands. Phew.
Of course, we can't wait to see it lit, so instead of proceeding to the cleanup of gooey wax and soldering paste, we plunk the dirty shade down on newspapers on the dining room table and get an extension cord with two light bulbs (one daylight fluorescent, one incandescent; different light brings out different colors in the glass) and proceed to see what the fruit of our labors looks like in its finished form.

 All in all, the lamp was about what I expected, except I thought the background shading from top down, dark to light, was going to be a bit more dramatic. Every time we make a shade, we learn something new to improve on with the next effort.
The next steps I forgot to take pictures of, but Carl had to return the shade to the lamp positioner and return to the great outdoors again and solder for another ten hours or so as the entire inside of the shade needs to have the soldering done, too. He had to add reinforcement wires to the inside that follow along lead lines so they are invisible from the outside but help support the weight of the shade after it is complete.
When he was done soldering, we finally brought the shade inside, plopped it in the bathtub (as we have no other receptacle large enough to hold it) and applied massive amounts of elbow grease to the cleanup of the soldering paste and beeswax. After several hours of cleanup (such a mess!) the lamp is ready to have a patina applied.
Once again forgot to take pictures, but I take a brush dipped in a patina solution and basically paint over the solder lines until the shiny silver solder turns black. After an hour or two, I'm done with the patina work, wash the lamp one more time and dry it and then apply a wax to make it all shiny and pretty.
This shade is going to hang from the ceiling as soon as Carl gets the hardware for it made; until then, we have it placed on a base. Here's a few shots of the lamp and the different roses as we go 'round the lamp again:


 We started working on this shade on February 8, and I finished polishing it on March 9. As soon as we have the shade installed on the ceiling, I'll post another picture.
So, if you've lasted this long, thank you for your patience, you are awesome.
Carl made his own lamp positioning jig for soldering that holds the heavy lamps in any position and also swivels very easily. The only problem with the lamp positioner is the fact it weighs so much and is clumsy; moving it is a delicate operation with the stained glass lamp perched out on the end. Carl and I wrestled the tool off the front porch and back into the house. We hooked up the heat gun and started spinning the lamp. The trick is to get the glass warm enough for the beeswax coated glass to melt off the fiberglass form and come free. For me, this is a nerve-wracking step in lamp construction, we've made seven lamps so far, and haven't dropped any. Yet.
 |
| Gentlemen, Start Your Heat Guns! |
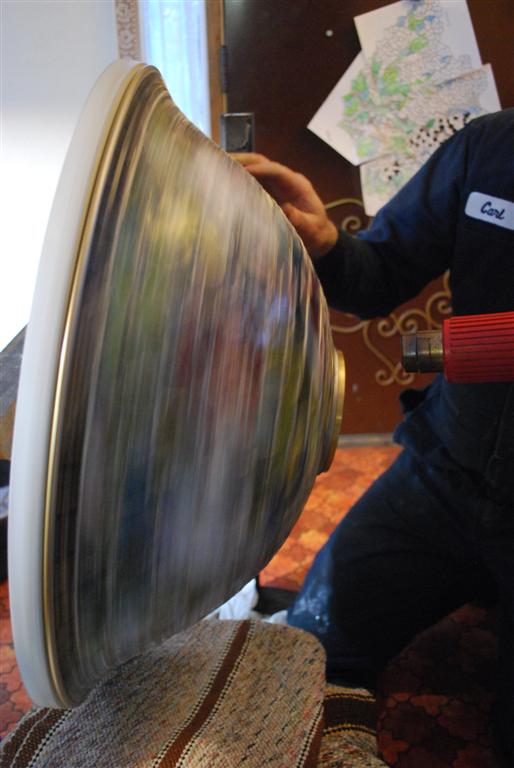 |
| Dizzy, my head is spinning.... |
Of course, we can't wait to see it lit, so instead of proceeding to the cleanup of gooey wax and soldering paste, we plunk the dirty shade down on newspapers on the dining room table and get an extension cord with two light bulbs (one daylight fluorescent, one incandescent; different light brings out different colors in the glass) and proceed to see what the fruit of our labors looks like in its finished form.

There it is with the more yellow, incandescent light bulb, above.
And below, with the daylight fluorescent bulb:

The next steps I forgot to take pictures of, but Carl had to return the shade to the lamp positioner and return to the great outdoors again and solder for another ten hours or so as the entire inside of the shade needs to have the soldering done, too. He had to add reinforcement wires to the inside that follow along lead lines so they are invisible from the outside but help support the weight of the shade after it is complete.
When he was done soldering, we finally brought the shade inside, plopped it in the bathtub (as we have no other receptacle large enough to hold it) and applied massive amounts of elbow grease to the cleanup of the soldering paste and beeswax. After several hours of cleanup (such a mess!) the lamp is ready to have a patina applied.
Once again forgot to take pictures, but I take a brush dipped in a patina solution and basically paint over the solder lines until the shiny silver solder turns black. After an hour or two, I'm done with the patina work, wash the lamp one more time and dry it and then apply a wax to make it all shiny and pretty.
This shade is going to hang from the ceiling as soon as Carl gets the hardware for it made; until then, we have it placed on a base. Here's a few shots of the lamp and the different roses as we go 'round the lamp again:


So, if you've lasted this long, thank you for your patience, you are awesome.
Once again, since we have snow on the ground and no flowers, I am linking up to Fertilizer Friday with these fake roses. So head on over to Tootsie's to see real flowers in other people's gardens!

33 comments:
Wow !!! Fantastic post.
Some peoples have a great talent in there hand.
It is a amazing lamp, bravo, bravo.
I love it.
Yep ... I'll second that WOW! Maybe even add in a WOWSERS! It's such an intricate and delicate process, but the end result is just stunning. You both must be the most patient careful people ... well done to you both!
Ellada and Bernie, thank you both so much, we really appreciate the encouraging words!
Karen your comment came in the perfect time to take my mind off my worries.. My daughter is at this moment, with her three children, on the roof of her house in Guam... waiting for the water to come in.. she calls me every 30 minutes since 3am this morning... Thank you for taking my mind off all this even for a moment....will come back and read your post later...
Sandy
Dear Karen ~ I've been wondering where you were, now I know. That shade is so beautiful! What a lot of time, energy, love and creative juices went into this piece. The videos were great too. The three of you did a fantastic job, and it is neat seeing a family work together on a project like this.
Hope your snow melts soon.
Love and hugs to you ~ FlowerLady
Karen, the shade is beautiful. What a laborious task but well worth the end result.
Eileen
Your lamp turned out beautifully. It must have taken a really long time Karen cutting and foiling all those pieces. I really enjoy cutting and fitting, but not soldering. My husband is a great solderer like Carl, being both a welder and plumber, but do you think he would help? NOT. I never tried a lamp, but I do plan a couple more windows. Finding the time is the problem. You have such a beautiful and large garden. I don't know how you find the time for such an involved piece. It turned out so gorgeous.
Karen, Your lamp is exquisite! Stunning! Beautiful! Colorful! I love it, Karen. What a long process but what a thing of beauty you and Carl have created.
Blessings, Beth
Loved your long post. Never knew all the steps to make stained glass and can now appreciate all the time and effort that goes into it. It is already beautiful but will be even more so when hung in place.
OMG That is Gorgeous!!!!!
In fact i think I want one! So much work but what a glorious finished product. all I can say is WOW!!!!
Blessings Meg
WOOOOOOOOOOWWWWWW!!!! That is so incredible!!!!! You two do beautiful work, an seem to work beautifully together as well...WOW again!!!
Sandy, my heart goes out to you, I pray for your family's safety, please keep us posted.
Flower Lady, thank you, and yes, it's good to be back posting again. I sort of let the stained glass get the upper hand. ;')
Thank you, Eileen!
Donna, I have no doubts at all if you had the time you would create museum-quality lamps using your own designs. You are so talented and everything you turn your hand to is a work of art! Time is the biggest factor involved, and I'm blessed to have a lot on my hands during the winter. I guesstimate about 200+ hours on this lamp, but I'm not the fastest kid on the block. The stained glass keeps me out of mischief.
Thank you, Beth!
Rosemary, I'm glad you made it through to the end of my post, thank you!
Meg, thank you, gosh, I'm blushing here.
Jester, yes we 'seem' to work well together, but all the fights were edited out of the time lapse videos...(just kidding!) We do OK now, but the first stained glass project (a window) we made back in 1979 was almost our last...Carl is SO picky. But I learned. And he lightened up a bit. LOL
What a fascinating, intricate process! This detailed post was just what I was hoping for, when I heard you were making another lamp shade. I will never do this kind of beautiful work, but I love just seeing how it's done, and how much work it is.
It's lovely. You and Carl are both very talented.
Wow I was tired just reading about the process it took you to create this stunning lampshade. No wonder they cost so much. A treasure for a lifetime. V
Thank you, Alison, I'm glad I didn't bore everyone to tears with this post.
Gardening in a Sandbox, thank you, I hope they do get handed on down the line.
So beautiful!
My goodness Karen! You and your husband are very talented indeed...
Your work is just beautiful... I'm so glad I popped by to * meet * you at your blog...
Keep up the good work...WOW!
Deb
OMG!!! You are soooo talented! Absolutely gorgeous!
*hugs*deb
Incredible. Eye Opening. I really don't have works for the magnitude of your families art. What a wonderful post and thank you for stopping by my blog! Cheers, Jenni from Oregon
Dear Karen, Such talent! The process is fascinating. I will look at similar lamps with a new appreciation after reading this post. Thank you for your kind comments and good wishes on my blog! P X
What an incredibly beautiful lamp you have created.
Thank you for sharing the process.
I have to admit I didn't read the whole post, but looked at all the photos, and did read parts of it. I know I'll never accomplish anything like that. It is so beautiful! You guys have a gift to be able to produce something like that!
So very interesting, I had no idea how the lamp was constructed. Absolutely fabulous. A true work of art and love.
Karen you never cease to amaze me with your talents. Even with your detailed post here, I would never be able to make such a beautiful work of art. Beautiful.
Iowa Gardening Woman and Deb, so glad you stopped by and thank you!
Jenni, how very nice to meet you!
Pam, thank you and I hope all goes well for you.
Greenearth, glad you enjoyed the process, and thanks!
Sue, bless your heart for trying to wade through some of the process, I know it's time-consuming just to read about.
Tufa Girl, aw, you're too kind!
Carolyn, thank you very much!
I haven't made a lamp yet, but this one you've created is a work of art beyond description. A beauty!
Lana
Ever since I started reading your blog I have wondered when we were going to see the stained glass works you do. This is truly the most beautiful lamp I have ever seen. Thank you so much for going into such details to explain it all. You are an amazing family - congratulations!
[url=http://www.webbootuk.co.uk/ultra-short-ugg-chestnut-p-48.html#sx9aycw6mu]Ultra Short Ugg Chestnut[/url]
[url=http://www.webbootuk.co.uk/ugg-boots-cardy-black-p-19.html#ui5znpf9vo]Ugg Boots Cardy Black[/url]
[url=http://www.homeugh.co.uk/ultra-short-ugg-chocolate-p-47.html#xp9kkcu4to]Ultra Short Ugg Chocolate[/url]
[url=http://www.webbootuk.co.uk/chestnut-ugg-boots-c-16.html#tp1sywe5ta]Chestnut Ugg Boots[/url]
[url=http://www.webbootuk.co.uk/ugg-bailey-button-triplet-chestnut-p-81.html#zr2pwny3yr]Ugg Bailey Button Triplet Chestnut[/url]
ugg slipper reviews [url=http://www.homeugh.co.uk][b]Black Ugg Boots[/b][/url] uggs boots us [url=http://www.webbootuk.co.uk][b]ugg boots uk[/b][/url] ugg boots uk
This lampshade is absolutely stunning. You two have served as inspiration to me! I am going to make one of these come hell or high water :) Now to get started in stained glass! Lucky for me I have an uroboros glass distributor close to me. Hopefully I can find a mold second hand somewhere, they get spendy fairly quick.
Thanks for the amazing post! I look forward to seeing your future lamps!
It's absolutely beautiful, I've made 2 of these myself and appreciate all of the work you've done. One of the shades was for my daughter with her wedding colors,it was made so years after I'm gone she'll remember me every time she looks at it. Great work......
Post a Comment